Enable user authentication on your pages using the Account addon, for whenever an interactive experience requires users to return and be securely identified and authenticated.
How To Setup
To enable and configure the Account Addon:
- Open the Building Blocks on the left sidebar of the Editor
- Search for “Account”
- Drag the Account addon onto your project to enable it
- Create a new Account addon and give it a name, e.g. Account Manager
- Optionally add fields to the User Data, which will be information that you can store when you create a user.
If no private data or any relevant or sensitive data is being stored, you can consider disabling the password requirement, so that instead of authentication, the Account addon works only as identification.
Actions
Once your Account addon is enabled and configured, you get access to the following actions with which you can interact with the addon:
Create a user based on username and password. Once created, the user can return to an interactive experience and re-identify its account via the Login action.
| Settings | Username. Select a datafield as the username to authenticate the user with, such as an email, a customer ID or some other identifier. Password. Select a datafield as the password to authenticate the user with. This option only appears if the password option is enabled on the Account addon configuration. |
| Outcomes | If success. Executes if the user has been successfully logged in; any data associated with the user becomes available via the respective fields on the Account addon; the User Status datafield changes to Logged In. Account already exists. Executes if a user account already exists for the given username. |
Logs in a user based on a given User ID and password.
| Settings | Username. Select a datafield as the username to authenticate the user with. Password. Select a datafield as the password to authenticate the user. This option only appears if the password option is enabled on the Account addon configuration. |
| Outcomes | If success. Execute if the user has been successfully logged in; any data associated with the user becomes available via the respective fields on the Account addon; the User Status datafield changes to Logged In. If fail. Executes if a wrong username and/or password are provided. |
Updates the custom data of a logged in user.
| Settings | Data. If any data was defined under the Account Addon settings, you can now pass in the values to update the user with. |
| Outcomes | If success. Executes if the user was logged in and the data was successfully updated. If user not logged in. Executes if current user is not logged in. |
Logs out the currently logged in user. User data previously available via the Account addon becomes no longer available until a future authentication.
The User Status datafield changes to Not Logged In.
You can use the above actions to create the familiar experience of quickly creating an account, logging in and logging out.
Tip: combine autocomplete for the email input field and input type setting for the password field when configuring your create account and login forms to provide the best authentication experience.
Datafields
The following datafields are available on the Account addon:
The User Status datafield starts changes value when the user logs in or logs out. The default value is Not Logged In.
| Not Logged In | The user has not yet logged in, or has already logged out. |
| Logged In | The user has successfully logged in, and has an active session. |
Integrating With Other Addons
Other Addons may integrate with the Account Addon to provide an added layer of security and encouraging experiences with recurring visits from participants.
Here’s the current list of Addons that can integrate with the Account Addon:
One Addon, Multiple Pages
When you unbind an Account addon from a project, it is still be available for that project, but can now be simultaneously enabled on any other project, so you should only do this if you wish to use an Account addon in multiple projects.
To allow users to reutilize the same credentials across multiple experiences:
- Open the Addons menu on the right sidebar of the Editor
- Enable the Account addon and click Edit Settings
- Click to enter the Account addon you wish to use, or create a new one
- Click the three dots menu on the top right corner
- Select Unbind from page, then click Yes, unbind this Account addon
Important: This change is irreversible.
Reset Password
The Reset Password feature of the Account Addon provides the ability for users to reset their passwords. After a user requests a password reset (which is done through an Action), Dot.vu will use an Email Service Provider to send an email to the user with a link he can use to set a new password.
Note that for using the Reset Password feature you must enable the usage of “Email” and “Password”.
Reset Password Flow
To have a clear understanding of how the Reset Password feature works, we are going to explain what is the recommended flow for resetting passwords.
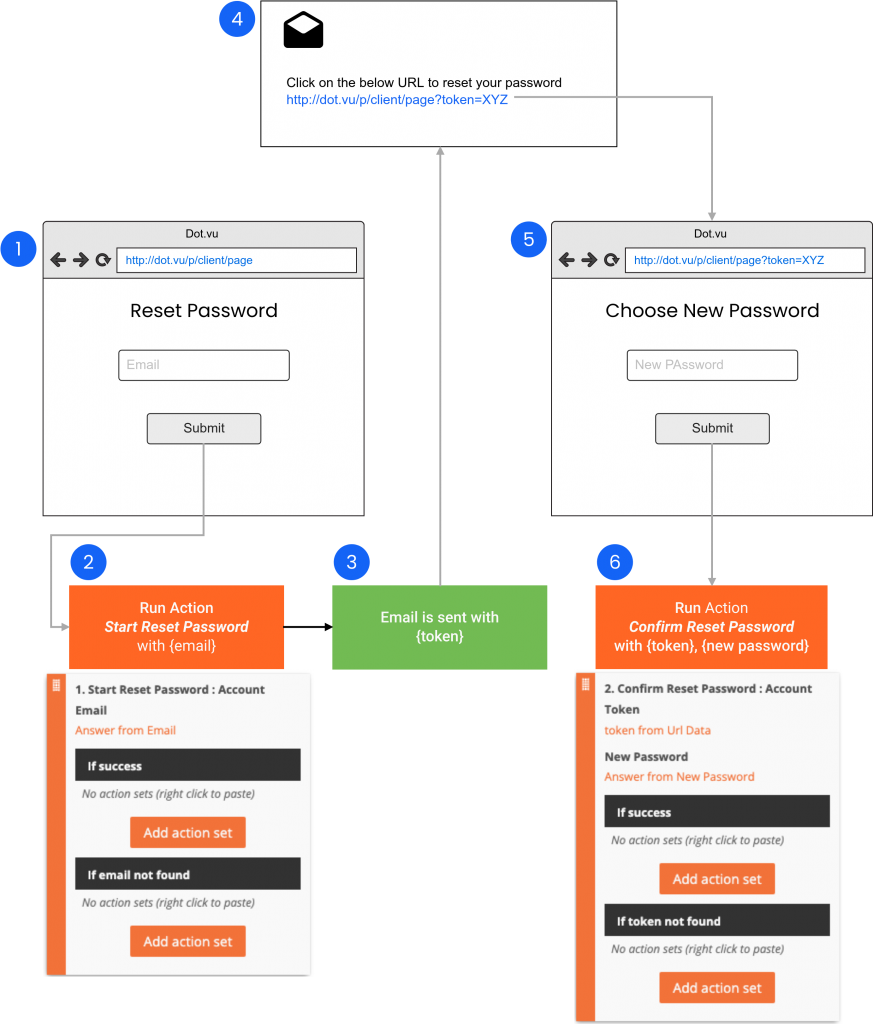
- Reset Password screen: To start the Reset Password process you will need to create a new Stage in your project where you request the user’s email in order to send him a verification email. The Submit button will then run the “Start Reset Password” action.
- Start Reset Password Action: This action will receive a user’s email and if the email exists in the account it will send an email to the user.
- Sending the email: Dot.vu will use a 3rd party Email Server, provided by you, to send the email. The configuration of the Email Server and the message is explained below. What is important to understand in this flow is that the email is sent with a private and unique token that must be used to complete the password reset process.
- Email Content: The recommended flow is that you use the unique token to generate a URL that sends the user back to your page. Your project should be configured with the URL Data Addon so that you can read the token.
- Choose a new Password: Once the user is back on your page, with the token in the URL, you display a form that requests the new password. The Submit button will then run the “Confirm Reset Password” action.
- Confirm Reset Password: Lastly, this action receives the unique token and the user’s new password to change the user’s password. After this step is finished you should forward the user back to the login form, where he can use his new password.
Configuring the Email Server
In order to send the reset password email, Dot.vu will use a 3rd party Email Server. This Email Server needs to be provided by you.
To connect to your Email Server an SMTP Authentication must be provided. You will need the following information:
- Hostname
- Port
- Username
- Password
If you are unsure of how to get this information, please ask your IT department for help. You can also contact us in case you do not have an Email Server provider.
Configuring the Email Content
The email content is the email your customers will receive when requesting a new password.
To configure it, fill out the following information:
- From Email: From whom’s behalf do you want to send the email (also called the sender’s email)? Here are some examples: noreply@mycompany.com, service@mycompany.com
- From Name: The sender’s name. Some examples: “My Company”, “My Company Campaign”.
- Subject: What is the subject of the Reset Password email.
- Body: The content of the email. It is important to note that
- The body content is in HTML format. Using HTML enables you to format the email with images and URLs.
- A special word should be used to print the token: {{token}}
An example of a body that links to your page, using URL data would be:
<p>You have requested a new password.</p>
<p>In order to proceed changing your password click <a href="https://dot.vu/p/client/page?token={{token}}">here</a>.</p>
Notice the usage of {{token}} to build the URL.